本文是两部分教程的第 2 部分,演示了如何结合使用 Atlas Operator、Atlas Cloud 和 ArgoCD,为在 Kubernetes 中管理数据库迁移创建一个时尚的 GitOps 工作流程。译自 GitOps for Databases, Part 2: Atlas Operator and ArgoCD。作者 Rotem Tamir 。
在第 1 部分中,我们演示了如何初始化一个 Atlas 项目,并创建一个 CI/CD 流水线,通过 GitHub Actions 自动计划、验证和存储数据库迁移到 Atlas Cloud。
在这一部分,我们将展示如何使用 Atlas Operator 和 ArgoCD 来部署这些迁移,以演示数据库迁移的完整 GitOps 工作流程。
"我们可以把现有的 schema 管理解决方案装入容器,并以 Kubernetes Jobs 的形式在 Kubernetes 中运行它们。但这很傻。这不是我们在 Kubernetes 中工作的方式。"
-Viktor Farcic,DevOps 工具包
随着应用程序的演进,其数据库模式也在演进。自动化部署数据库模式变更的实践随着现代 DevOps 原则的发展而进化成为所谓的数据库迁移。作为这一演进过程的一部分,已经创建了数百种“迁移工具”来帮助开发人员管理他们的数据库迁移。这些工具范围从面向 Python 的 Alembic 等 ORM 和特定语言的工具,到语言无关的工具如 Flyway 和 Liquibase。
当 Kubernetes 出现时,团队开始将他们的应用程序容器化,本能反应是将这些传统工具封装在一个容器中,并在应用程序部署过程中运行它们。我们在最近的 KubeCon 演讲和更早的网络研讨会中讨论了这种方法的一些缺点。
Atlas 从零开始创建,是一种现代数据库迁移工具,它体现了现代 DevOps 原则,并且设计为在 Kubernetes 中原生运行。Atlas Operator 使团队能够使用代表数据库 schema 和迁移的新资源类型扩展本地 Kubernetes API。通过使用这些功能,可以将数据库迁移原生集成到 GitOps 工作流程中。
- 运行的 Kubernetes 集群 - 出于学习目的,您可以使用 Minikube,这是一个在笔记本电脑上运行单节点 Kubernetes 集群的工具。
- kubectl - 与 Kubernetes 集群交互的命令行工具。
- Helm - Kubernetes 的包管理器。
要安装 ArgoCD,请运行以下命令:
kubectl create namespace argocd
kubectl apply -n argocd -f https://raw.githubusercontent.com/argoproj/argo-cd/stable/manifests/install.yaml
等待 argocd 命名空间中的所有 pod 都处于运行状态:
kubectl wait --for=condition=ready pod --all -n argocdkubectl 会打印出类似下面的信息:
pod/argocd-application-controller-0 condition met
pod/argocd-applicationset-controller-69dbc8585c-6qbwr condition met
pod/argocd-dex-server-59f89468dc-xl7rg condition met
pod/argocd-notifications-controller-55565589db-gnjdh condition met
pod/argocd-redis-74cb89f466-gzk4f condition met
pod/argocd-repo-server-68444f6479-mn5gl condition met
pod/argocd-server-579f659dd5-5djb5 condition met
如果遇到一些错误,请参考 Argo CD 文档以获取更多信息。
helm install atlas-operator oci://ghcr.io/ariga/charts/atlas-operator
Helm 会打印出类似下面的信息:
Pulled: ghcr.io/ariga/charts/atlas-operator:0.3.6
Digest: sha256:7e29c15e846fa9c25164f4ad5a7cb7f25e9ead2882082f0352985e58c1976f99
NAME: atlas-operator
LAST DEPLOYED: Mon Dec 11 10:25:11 2023
NAMESPACE: default
STATUS: deployed
REVISION: 1
TEST SUITE: None
等待 atlas-operator pod 处于运行状态:
kubectl wait --for=condition=ready pod -l app.kubernetes.io/name=atlas-operator -n default
kubectl 会打印出类似下面的信息:
pod/atlas-operator-866dfbc56d-qkkkn condition met
有关安装过程的更多信息,请参阅 Atlas Operator 文档。
首先,使用以下命令部署一个简单的 PostgreSQL 数据库:
kubectl apply -f https://raw.githubusercontent.com/ariga/atlas-operator/master/config/integration/databases/postgres.yaml
这将创建一个 Deployment,运行一个单节点的(非持久化)PostgreSQL 实例,以及一个在 5432 端口上公开它的 Service。另外,它还将创建一个包含数据库凭据的 Secret。
等待数据库 pod 运行:
kubectl wait --for=condition=ready pod -l app=postgres -n default
为了让 Atlas Operator 知道需要应用哪些迁移,我们需要创建一个 AtlasMigration 资源,指向在第 1 部分中创建的 Atlas Cloud 项目。在 GitHub 存储库中创建一个名为 manifests 的新目录。在其中,使用以下内容创建一个名为 atlas-migration.yaml 的文件:
apiVersion: db.atlasgo.io/v1alpha1
kind: AtlasMigration
metadata:
  name: migration
spec:
  urlFrom:
    secretKeyRef:
      key: url
      name: postgres-credentials
  cloud:
    project: "atlasdemo" # Atlas Cloud project name
    tokenFrom:
      secretKeyRef:
        name: atlas-credentials
        key: token
  dir:
    remote:
      name: "atlasdemo" # Migration directory name in your atlas cloud project
      tag: "1d579be616db48803bb21713fd836a9165030f18" # See below on how to obtain this value for your project.
这个资源告诉 Atlas Operator 将 Atlas Cloud 中 atlasdemo 项目中的迁移应用到 postgres-credentials secret 中指定的数据库。请注意,tokenFrom 字段引用了一个名为 atlas-credentials 的 secret。这个 secret 将包含我们在第 1 部分中创建的 Atlas Cloud API token。
要创建它,请运行:
kubectl create secret generic atlas-credentials --from-literal=token=aci_<replace with your token>
获取 tag 字段
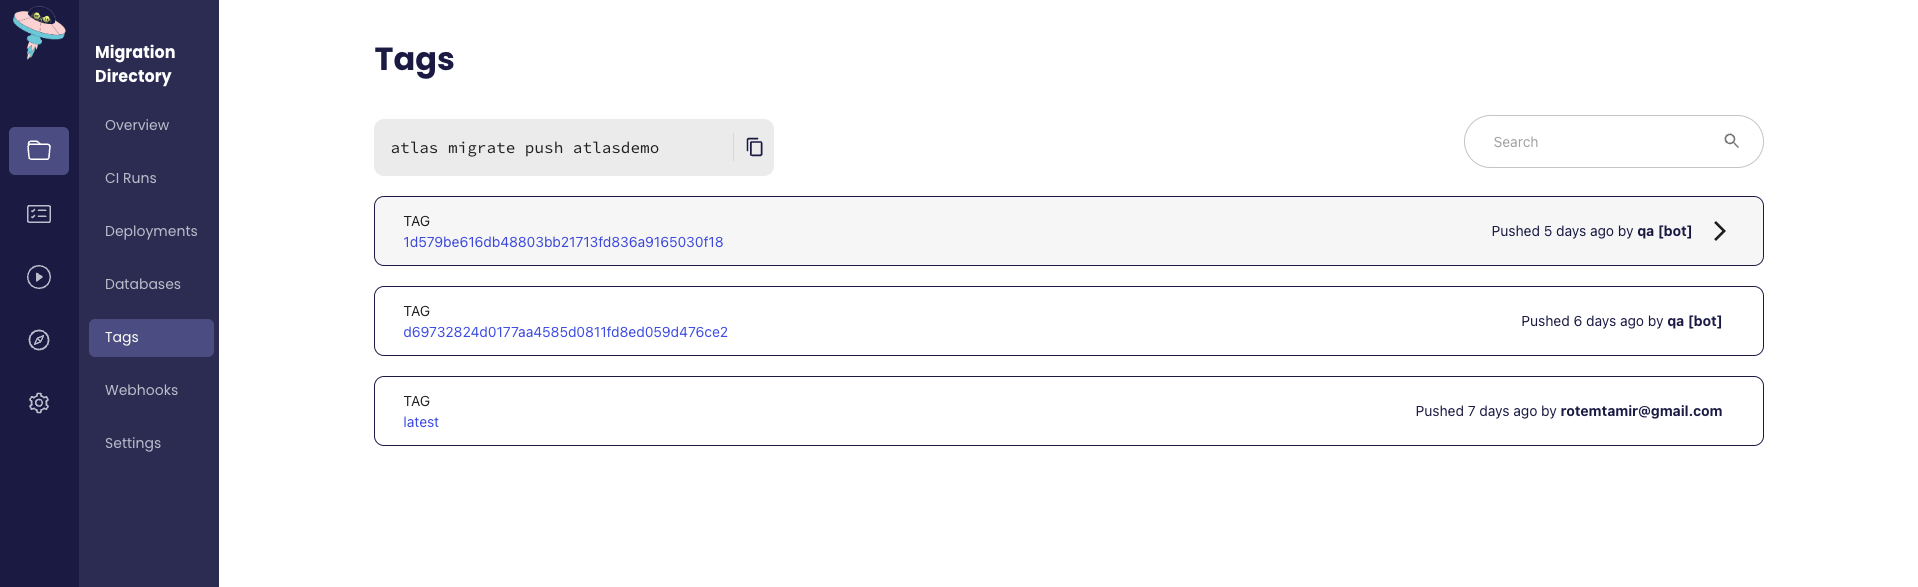
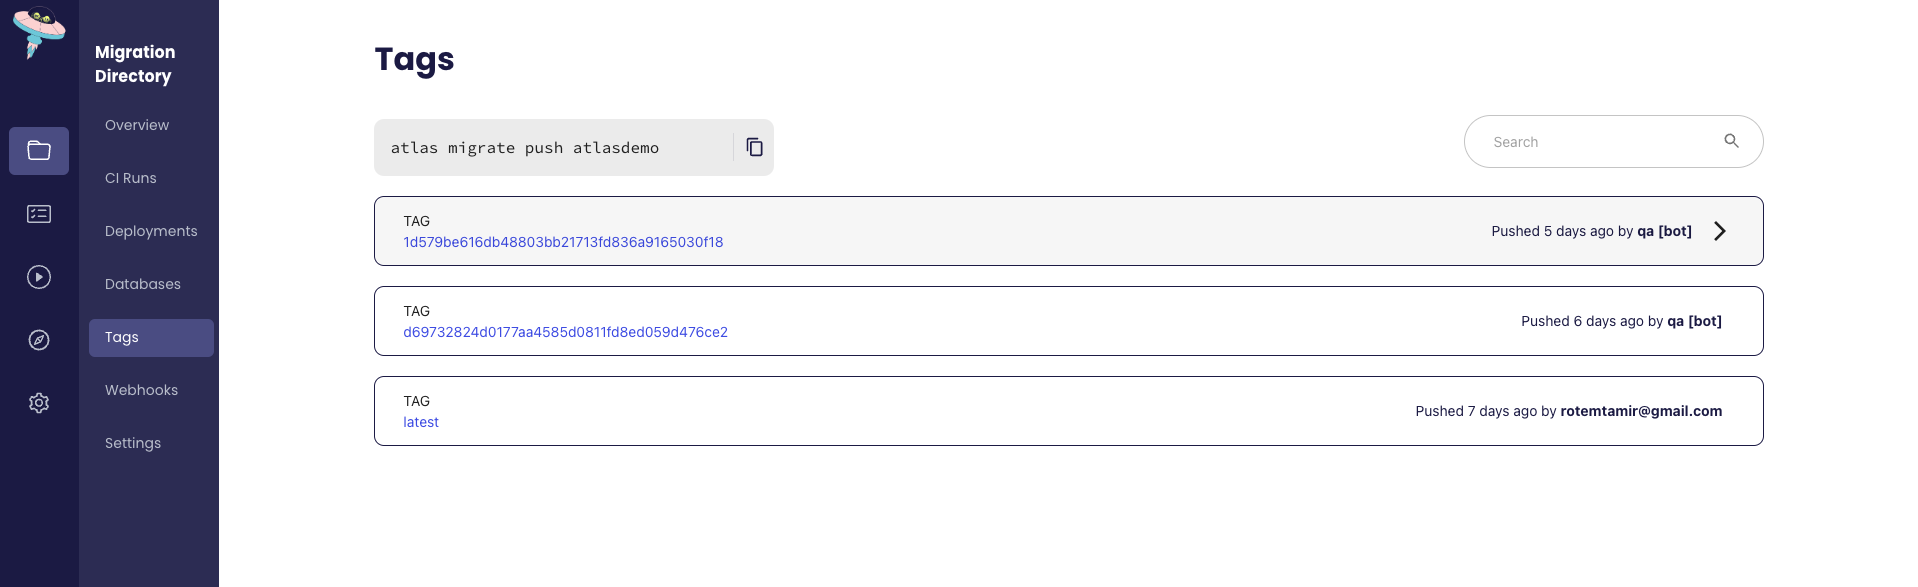
请注意 dir 部分中的 tag 字段。这个字段告诉 Atlas Operator 应用哪个版本的迁移。在这种情况下,我们告诉它应用标记为提交哈希 1d579be616db48803bb21713fd836a9165030f18 的迁移,这是我们在第 1 部分中创建的拉取请求的合并提交的提交哈希。
要查看迁移可用的标签,请转到你的 Atlas Cloud 项目,并单击“标签”选项卡。你应该会看到类似下面的页面:
提交变更并推送到你的 GitHub 存储库。
现在我们已经创建了 AtlasMigration 资源,我们可以创建一个 ArgoCD 应用程序来部署它。在 GitHub 存储库的根目录中创建一个名为 Application.yaml 的文件,内容如下:
apiVersion: argoproj.io/v1alpha1
kind: Application
metadata:
  name: atlas-argocd-demo
  namespace: argocd
  finalizers:
    - resources-finalizer.argocd.argoproj.io
spec:
  source:
    path: manifests
    repoURL: 'https://github.com/<your gh user>/<your repo name>'
    targetRevision: master
  destination:
    namespace: default
    server: 'https://kubernetes.default.svc'
  project: default
  syncPolicy:
    automated:
      prune: true
      selfHeal: true
    retry:
      limit: 5
      backoff:
        duration: 5s
        maxDuration: 3m0s
        factor: 2
  syncOptions:
    - CreateNamespace=true
请确保使用你的 GitHub 存储库的 URL 替换 repoURL 字段。
提示:
如果你的存储库是私有的,你需要创建一个 GitHub 个人访问令牌,并通过运行以下命令告诉 ArgoCD:
export CURRENT_NS=$(kubectl config view --minify --output 'jsonpath={..namespace}')
kubectl config set-context --current --namespace=argocd
argocd repo add https://github.com/<user>/<repo> --username <user> --password ghp_<your token>
kubectl config set-context --current --namespace=$CURRENT_NS
接下来,应用应用程序清单:
kubectl apply -f Application.yaml
等待应用程序部署完成:
kubectl wait --for=condition=ready atlasmigration/migration
观察迁移对象的状态:
kubectl get atlasmigration/migration -o jsonpath='{.status}' | jq
输出将类似于:
{
  "conditions": [
    {
      "lastTransitionTime": "2023-12-11T08:38:35Z",
      "message": "",
      "reason": "Applied",
      "status": "True",
      "type": "Ready"
    }
  ],
  "lastApplied": 1702283914,
  "lastAppliedVersion": "20231206075118",
  "observed_hash": "6e4feac15a35d20c38e705428de507835c7c58d487eacc84ed012a17b002981d"
}
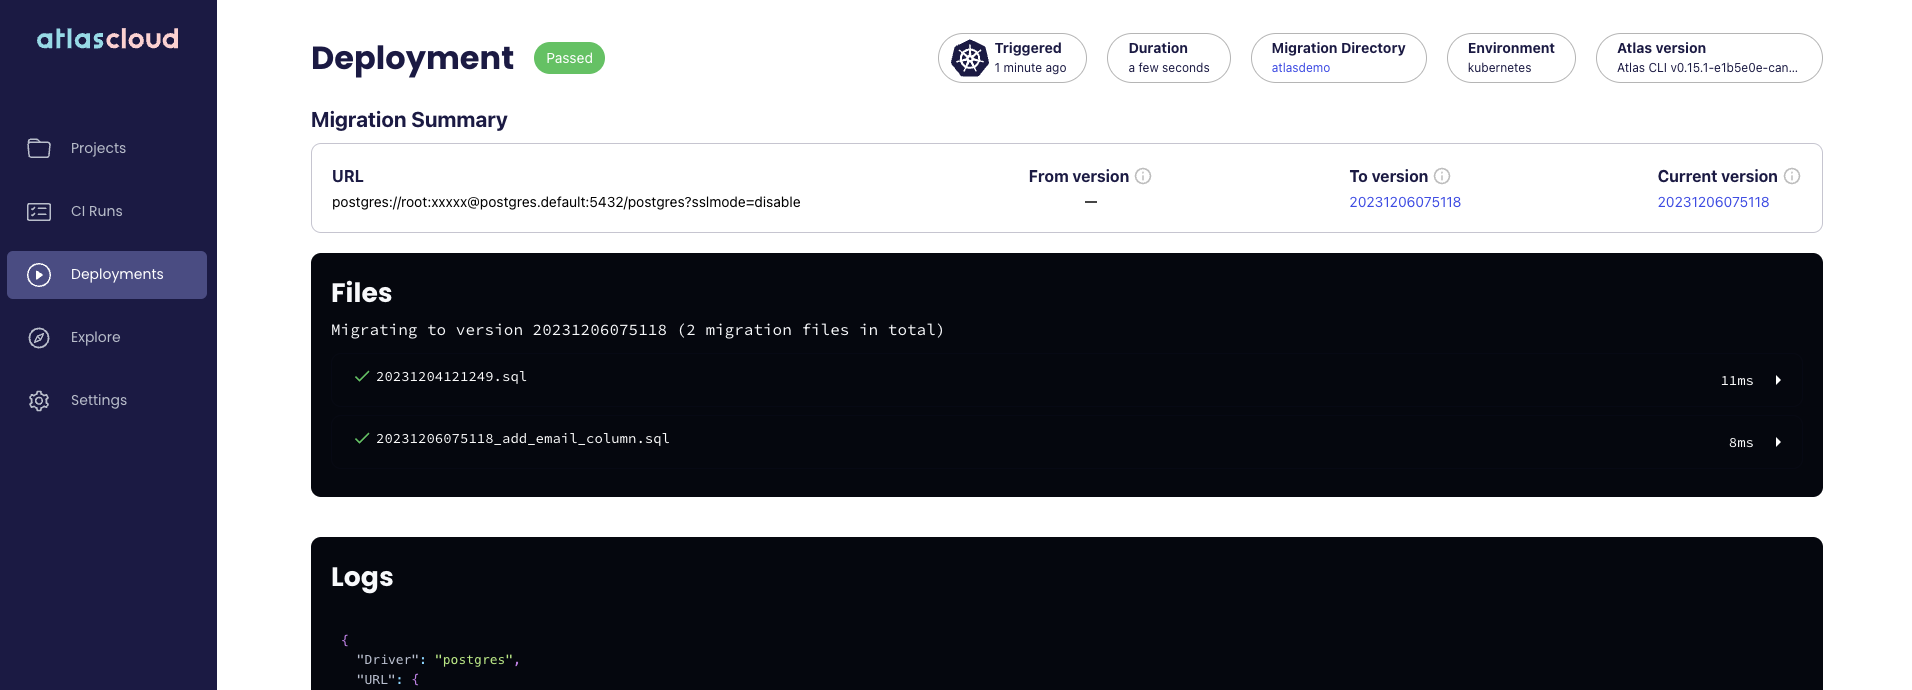
你也可以使用 Atlas Cloud UI 观察迁移的状态:
让我们回顾一下从端到端创建的流程:
- 开发人员修改 schema 的期望状态,并在本地使用 atlas migrate diff 生成迁移计划。
- 开发人员将迁移计划提交到他们的 GitHub 存储库,并创建一个拉取请求。
- GitHub Actions 运行 Atlas 持续集成工作流程,验证迁移计划是否正确和安全。
- 一旦拉取请求被合并,GitHub Actions 工作流程会将新的迁移推送到 Atlas Cloud。它被标记为合并提交的提交哈希。
- 当我们准备将更改部署到生产环境时,我们将 AtlasMigration 资源中的 tag 字段值更改为最新标签。我们将此更改推送到我们的 GitHub 存储库。
- ArgoCD 检测到更改并更新我们的 AtlasMigration 资源。
- Atlas Operator 检测到更改并将迁移应用到数据库。
现在,数据库的状态与我们 schema 的期望状态同步了!
总而言之,在本教程中,我们演示了如何使用 Atlas Operator 和 ArgoCD 在 Kubernetes 中为数据库迁移创建一个时尚的 GitOps 工作流程。
一如既往,我们非常乐意在 Discord 服务器上收到您的反馈和建议。
标签:
kubernetes
gitops
migrations
argocd
github-actions
postgres