通过 Argo CD 使用 GitOps 大规模启动 Otterize
译自 GitOps: How We Integrate a New Service in Under 1 Hour for 25 Clusters!,作者 Artem Lajko。
有趣的事实:我们仅用了一个多小时集成了新服务,但我们花了4个月的时间来购买许可证。因此,你的设置可以很快,但如果你的其它步骤是瓶颈,那么在游戏中引入新工具就没有什么关系了!
这不是一个关于责备的问题;有各种原因造成的,包括采购流程和数据保护考量。
在这里你可以看到我们试图完成并且成功实现的宏大目标(我们至少是这样认为)!

图 0 — 仅作概述!
为什么不能简单一些,为什么花了一整小时?
相信我,我也在不停地自问这个问题……!在技术堆栈中添加新服务时,最大的挑战是如何在不牺牲性能或可扩展性的情况下,无缝且大规模地进行集成。为什么这么难?嗯,每个工具都有其自身的特点——尤其是当您处理 SaaS、自托管解决方案以及安全管理凭据和令牌以建立安全连接时。
我们在 Otterize 中面临着同样的挑战。我们不仅在说部署 Helm Chart。我们必须考虑整个设置——连接到 SaaS、部署控制器等等。
由于我们注重效率,因此我们希望尽可能保持事情的简单。为什么?因为手动点击设置流程(又称 ClickOps)会造成错误和不一致。此外,我们说实话,我们有点懒。因此,我们的目标是尽我们所能实现自动化。
因此,介绍就到此为止,让我们继续进行下一步,并概述我们实际想要设置的内容。
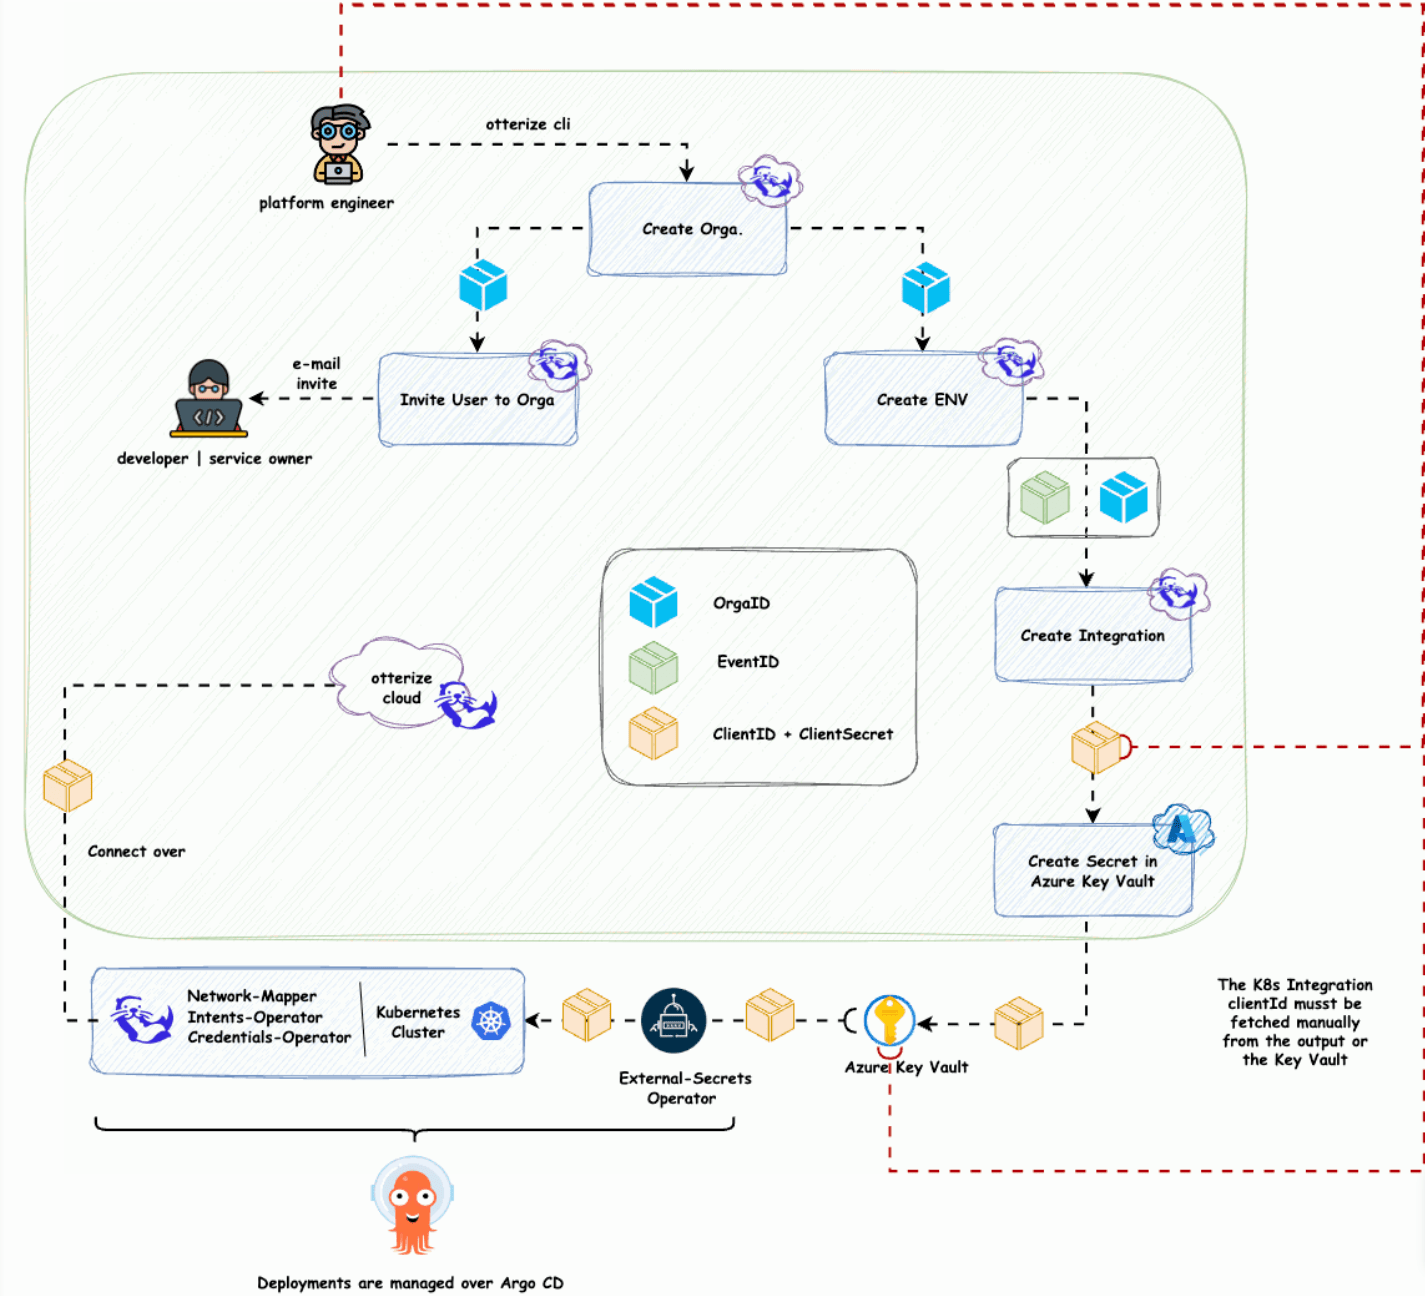
这是我们希望实现的目标:

图 1 —让我们逐条过一遍这些要点!
- 创建组织:在 Otterize 中设置组织。
- 邀请用户 (2.2):让合适的人员加入组织。
- 设置环境 (2.1):创建必要的集成环境。
- 使用 Kubernetes 创建集成:使用 clientId 和 clientSecret 连接到云解决方案。
- 保护凭据:将 clientId 和 clientSecret 推送到 Azure Key Vault。
- 部署所有内容(建立连接):使用 Argo CD 部署 Otterize 堆栈、External Secrets Operator 以及任何相关的秘密和
关于客户端 ID 的快速说明:截至 2024 年 8 月 16 日,不能直接从机密中引用 clientId。因此,目前我们要手动将 clientId 添加到集群的值中。
我们首先使用 Otterize CLI 创建了一个组织:
otterize organization create --format json
输出如下所示:
[
  {
    "id": "org_h....",
    "name": "Cryptocurrency Crusader Otters"
  }
]
之后,我们将其重命名以匹配我们的集群和阶段:
otterize org update "org_..." --name "cluster-name-stage"

ID             NAME                  IMAGE URL

Organization updated
Organization renamed to: cluster-name-stage
接下来,我们创建环境:
otterize environment create --org-id "org_fcb967hrqz" --name test3 --labels test=true,env=test,env2=test2 --format json
输出如下所示:
[
  {
    "appliedIntentsCount": 0,
    "id": "env_ubpiqq7odl",
    "labels": [
      {
        "key": "env",
        "value": "test"
      },
      {
        "key": "env2",
        "value": "test2"
      },
      {
        "key": "test",
        "value": "true"
      }
    ],
    "name": "test2",
    "namespaces": [],
    "serviceCount": 0
  }
]我们向团队成员发出了邀请:
otterize invites --org-id "org_..." create --email "artem.lajko@...."
输出如下所示:
ID             EMAIL                      ORGANIZATION ID INVITER USER ID STATUS  CREATED AT                           ACCEPTED AT
inv_fn3evo2p7p artem.lajko@               org_            usr_u  PENDING 2024-08-15
Invite sent to artem.lajko@
然后,我们创建了 Kubernetes 集成:
otterize integrations create --org-id "org_...." kubernetes --env-id env_6u... --name test-k8s --format json
输出如下所示:
Caution: this CLI was built with a different version/revision of the Otterize Cloud API.
Please run otterize version for more info.

[
    {
        "cluster": {
            "id": "cluster_q..."
        },
        "components": {
            "credentialsOperator": {
                "status": {
                    "type": "NOT_INTEGRATED"
                },
                "type": "CREDENTIALS_OPERATOR"
            },
            "intentsOperator": {
                "configuration": {
                    "awsIAMPolicyEnforcementEnabled": false,
                    "databaseEnforcementEnabled": false,
                    "egressNetworkPolicyEnforcementEnabled": false,
                    "globalEnforcementEnabled": false,
                    "istioPolicyEnforcementEnabled": false,
                    "kafkaACLEnforcementEnabled": false,
                    "networkPolicyEnforcementEnabled": false,
                    "protectedServices": [],
                    "protectedServicesEnabled": false
                },
                "status": {
                    "type": "NOT_INTEGRATED"
                },
                "type": "INTENTS_OPERATOR"
            },
            "networkMapper": {
                "status": {
                    "type": "NOT_INTEGRATED"
                },
                "type": "NETWORK_MAPPER"
            }
        },
        "credentials": {
            "clientId": "cli_...",
            "clientSecret": "df5..."
        },
        "defaultEnvironment": {
            "id": "env_6u..."
        },
        "id": "int_...",
        "name": "clsuter-name-stage",
        "organizationId": "org_...",
        "type": "KUBERNETES"
    }
]我们将凭据安全地存储在 Azure Key Vault 中:
az keyvault secret set --vault-name kv... --name "otterize-cloud-client-secret" --value ".." >/dev/null`
`az keyvault secret set --vault-name kv... --name "otterize-cloud-client-id" --value ".." >/dev/null
最后,我们使用必要的凭据更新了 Helm Chart:
    otterizeCloud:
      certificateProvider: otterize-cloud
      credentials:
        # fill clientId and clientSecret in order to connect to Otterize Cloud
        clientId: "cli_..."
        clientSecretKeyRef:
          secretName: otterize-cloud-credentials-secret-key
          secretKey: otterize-cloud-client-secret
我们使用 Python 模板引擎自动将 clientId 插入到我们的值中。
查看是否一切按预期工作:

图 1 —让我们逐条过一遍这些要点!
当然,我们没有手动执行此操作 - 我们有一个模板引擎可以自动执行整个过程。运行脚本后,一切都顺利部署,没有出现任何问题。
这里您可以看到脚本(没有模板),但最终输出并执行的内容。
#!/bin/bash

# Set environment variables


NAME="<cluster-name-stage>"
STAGE="<stage>"
SUBSCRIPTION="<...>"
KEY_VAULT_NAME="<...>"
LABELS="cluster=<>, env=<>,..."
OTTERIZE_CLOUD_INVITE_USERS="braveone@e-mail.com,lazy@e-mail.com,..."
GROUP_ID="..." #Azure AD Group (Platform Team)


# Function to set the subscription
set_subscription() {
    az account set --subscription $SUBSCRIPTION
    if [ $? -ne 0 ]; then
        echo "Failed to set Azure subscription."
        exit 1
    fi
}

# Step 1: Create the organization and save the ID in ORGA_ID
ORGA_ID=$(otterize organization create --format json | jq -r '.[0].id')
if [ -z "$ORGA_ID" ]; then
    echo "Failed to create organization."
    exit 1
fi
echo "Organization ID: $ORGA_ID"

# Step 2: Rename the organization with the provided NAME
otterize org update "$ORGA_ID" --name "$NAME"
if [ $? -ne 0 ]; then
    echo "Failed to rename organization."
    exit 1
fi
echo "Organization renamed to: $NAME"

# Step 3: Iterate over OTTERIZE_CLOUD_INVITE_USERS, retrieve user names, format the email in lowercase, and send invitations
IFS=',' read -ra ADDR <<<"$OTTERIZE_CLOUD_INVITE_USERS"
for email in "${ADDR[@]}"; do
    email=$(echo "$email" | xargs) # Trim any leading/trailing whitespace

    # Get the user's first and last name from Azure AD
    user_info=$(az ad user show --id "$email" --query '{firstName:givenName,lastName:surname}' --output tsv)

    # Extract the first name and last name
    first_name=$(echo "$user_info" | awk '{print $1}')
    last_name=$(echo "$user_info" | awk '{print $2}')

    # Construct the new email format and convert it to lowercase
    formatted_email=$(echo "${@hpa.hamburg.de">first_name}.${last_name}@hpa.hamburg.de" | tr '[:upper:]' '[:lower:]')

    # Send invitation using the formatted email
    otterize invites --org-id "$ORGA_ID" create --email "$formatted_email"
    if [ $? -ne 0 ]; then
        echo "Failed to send invite to $formatted_email."
    else
        echo "Invite sent to $formatted_email."
    fi
done

# Step 3b: Invite users from an Azure AD group by ID
group_emails=$(az ad group member list --group "$GROUP_ID" --query "[].mail" -o tsv | tr '[:upper:]' '[:lower:]')

for email in $group_emails; do
    if [ -n "$email" ]; then
        # Send invitation using the email directly from the group
        otterize invites --org-id "$ORGA_ID" create --email "$email"
        if [ $? -ne 0 ]; then
            echo "Failed to send invite to $email."
        else
            echo "Invite sent to $email."
        fi
    fi
done

# Step 4: Create the environment and save the ID in ENV_ID
ENV_ID=$(otterize environment create --org-id "$ORGA_ID" --name $STAGE --labels "$LABELS" --format json | jq -r '.[0].id')
if [ -z "$ENV_ID" ]; then
    echo "Failed to create environment."
    exit 1
fi
echo "Environment ID: $ENV_ID"

# Step 5: Create the integration and save the CLIENT_ID and CLIENT_SECRET
CREDENTIALS=$(otterize integrations create --org-id "$ORGA_ID" kubernetes --env-id "$ENV_ID" --name "$NAME" --format json | jq -r '.[0].credentials | "clientID=\(.clientId)\nclientSecret=\(.clientSecret)"')
CLIENT_ID=$(echo "$CREDENTIALS" | grep "clientID=" | cut -d'=' -f2)
CLIENT_SECRET=$(echo "$CREDENTIALS" | grep "clientSecret=" | cut -d'=' -f2)

if [ -z "$CLIENT_ID" ] || [ -z "$CLIENT_SECRET" ]; then
    echo "Failed to create integration or retrieve credentials."
    exit 1
fi

# Step 6: Push the client ID and client secret to the Azure Key Vault
az keyvault secret set --vault-name "$KEY_VAULT_NAME" --name "otterize-cloud-client-id" --value "$CLIENT_ID" >/dev/null
if [ $? -ne 0 ]; then
    echo "Failed to store Client ID in Azure Key Vault."
    exit 1
fi

az keyvault secret set --vault-name "$KEY_VAULT_NAME" --name "otterize-cloud-client-secret" --value "$CLIENT_SECRET" >/dev/null
if [ $? -ne 0 ]; then
    echo "Failed to store Client Secret in Azure Key Vault."
    exit 1
fi

echo "Client ID and Client Secret successfully stored in Azure Key Vault."

# Output the Client ID for the integration
echo "The Client ID for the integration is: $CLIENT_ID"
这看起来怎么样:

图 3– 一小时内连接 25 个集群!
理想吗? 不,我们更希望直接从 Secret 中引用 clientId。
这真的理想吗? 不,最好的解决方案是使用 Terraform provider 来简化工作流程,例如:

图 4 — 一个比 bash 脚本更易于整合的更简单的设置(希望未来会有一个 TF 提供商)!!
借助 GitOps 与 Argo CD 以及 External Secrets 等工具,我们能够简化设置并保持懒惰(以一种好的、明智的方式)。您现在已经了解了我们如何将 Otterize 大规模集成到我们的工作流程中。
等等…
什么是 Otterize 和 Otterize Cloud?如果您好奇,我在之前的博文中详细解释了这一点: